Laser engraver Lasersolid 530 Lite: full device review
LaserSolid is a technique that is designed to create fast and accurate engraving on almost any surface. The manufacturer's model range is regularly updated. In our review, we will talk about the Lasersolid 530 Lite laser engraver - a simple and budget device designed for cutting and engraving on various materials, from glass to cardboard.
About the Manufacturer
Manufacturer's specialization is the production of equipment for laser engraving and related accessories for these purposes. LaserSolid produces CNC laser engravers, laser markers, and components for them - lenses, laser tubes, mirror systems, cellular tables, autofocus, and other items that make the process of applying engraving to products simpler and of higher quality.
Review of the Lasersolid 530 Lite Laser Engraver
Processed Materials
- Wood
- Bamboo
- Organic glass
- Crystal
- Leather
- Rubber
- PVC
- Marble
- Ceramic
- Glass
- Plastics
Main Features
General characteristics of the engraver include weight, manufacturer's warranty, software used, and dimensions.
Equipment
Details about the equipment and specifications of the Lasersolid 530 Lite laser engraver.
Examples of Products
The Lasersolid 530 Lite laser engraver is ideal for small-scale production of exclusive products.
What Software is Used?
Information on the software used with the Lasersolid 530 Lite engraver, including Coreldraw, AutoCAD, Photoshop, and others.
Initial Setup and Preparation Instructions
Guidelines on the initial setup and preparation of the Lasersolid 530 Lite laser engraver.
Pros and Cons of the Lasersolid 530 Lite
Advantages
- Ease of use and machine setup
- Variety of usable materials
- Relatively low cost
- Full automation
- Good build quality
- Manufacturer's refusal to use plastic parts in key machine components
- User-friendly software
- Ability to set laser beam speed and power parameters independently
Disadvantages
- Does not support "plug and play" function, requires user assembly
- Limitations when working with metals
- The resource of the laser tube is limited to 6000 hours
- Software allows setting cutting parameters up to 1000 mm/s, but the device does not cope with these parameters, and quality cutting is possible only up to 800 mm/s
- Does not include a cellular cover for the table
- Small details can fall into the space under the dropping table
Engraver Features
- Adjustment of the filling depth is recommended by different pixel filling levels.
- Continuous vector engraving mode is optimal only when forming contours and cutting material.
- Simultaneous engraving and cutting should be done by first applying the pattern to the material, then starting the cutting procedure.
- Each element during engraving should be adjusted as a separate process to reduce idle travel and production time.
- One-way engraving modes yield higher quality products.
- All materials used for engraving or cutting should be stored horizontally and protected from moisture.
Equipment
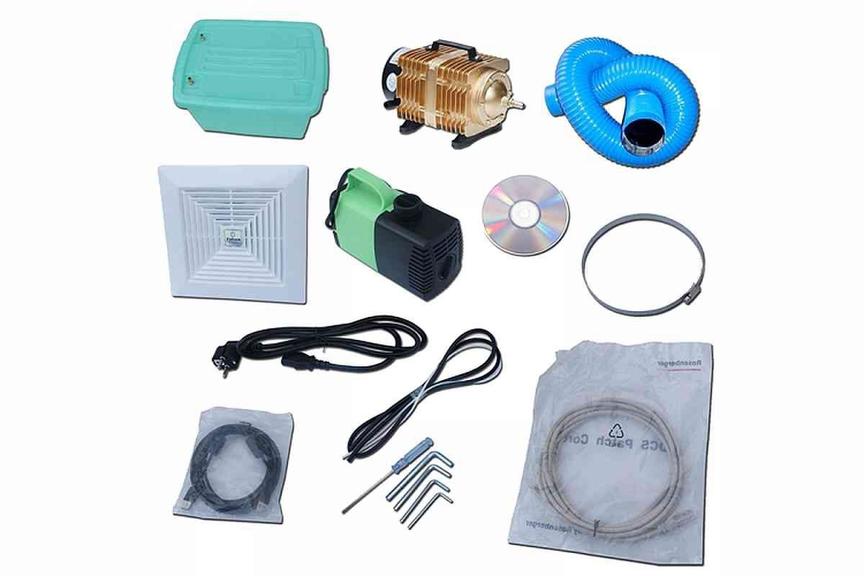
Lasersolid 530 Lite comes almost fully assembled - the user only needs to assemble the machine.
- Laser cutting machine
- Cellular table
- Lifting table (450 mm)
- Laser tube
- Water pump
- Air compressor
- Lens and mirror system
- Tools for assembling the device
- Set of cables for connection
Examples of Products
The Lasersolid 530 Lite laser engraver is ideal for small-scale production of exclusive products.
What Software is Used?
When working with the engraver, the user must first create a drawing in the program of their choice:
- AutoCAD
- Photoshop
- CorelDraw
Then the finished drawing is exported to AutoLaser, where the intensity and burning speed can be customized for different parts of the design. After the project is completely processed, the document (in DXF format) is loaded onto the engraver.
IMPORTANT! AutoLaser can save up to 256 different processes within one task, allowing each part of the project to have its own burning mode, beam power, and movement speed.
Initial Setup and Preparation Instructions
The engraver is partially assembled when delivered to consumers. After unpacking, the buyer needs to independently install the machine in its designated place, set up the laser, and connect and attach the cooling system.
- Debugging the equipment involves installing the software driver. To start the process, the user needs to enter the device manager and point the driver to the program file.
- The next step is testing the functionality of the device. The test program will run the machine at different modes and identify any problems, if any exist.
- The setup of the machine should strictly follow the instructions from the manufacturer. To configure it for working mode, all necessary information, including the characteristics of the motors, their speed and acceleration capabilities on each axis, port configurations, and milling or engraving modes, are entered into the input tab window.
Preparation of the Engraver for Use
- The machine is installed on a flat, stable surface.
- The ventilation hose of the system is connected to the device.
- An exhaust hood is installed (the exhaust hole should preferably be outside the room).
- A water tank is installed, and a pump is submerged in it.
- IMPORTANT! Ensure that the water circulates correctly and that there are no bends in the hoses. The water in the laser tube should circulate from bottom to top.
- The air compressor is installed. For this, the output hole of the compressor is connected to the air inlet of the engraver. Then it is powered.
- Grounding is completed. Necessary for safety and must be connected to all casings of the equipment used. The resistance of the grounding wires should not exceed 5 Ω.
Testing of the Device
- The machine is plugged in, and the switch on the device case is placed in the working position.
- The operation of the display and the functioning of the control keyboard is checked.
- Using the keyboard keys, the laser head is moved along the X and Y axes.
- The laser emitter and the correct connection of the water hoses and electrical power cords are checked.
- All associated systems (chiller, exhaust, compressor, etc.) are confirmed to be working properly.
- Before starting the production process, the machine must be calibrated. A test point is burned on the workpiece placed on the work table, after which the laser pointer is focused on the burn spot.
Operation of the Lasersolid 530 Lite Laser Engraver
- The drawing is prepared in AutoCAD, Photoshop, or CorelDraw.
- The finished sketch is uploaded to AutoLaser, and the manufacturing processes are configured.
- The processed file is loaded onto a USB drive and transferred to the device's memory.
- The desired file is selected using the engraver's display.
- Absolute zero is set.
- The focusing is checked.
- The engraving or cutting process is started.
About Lasersolid 530 Lite
Lasersolid 530 Lite is a laser engraver suitable for small companies specializing in small-scale production of souvenir and advertising products. The device is designed for applying engraving and cutting on all types of plastics, rubber, cardboard, wood, etc. The advantages of this model are the low cost, easy setup, and compactness.
