How to calibrate the PID extruder?
The extruder has its own settings. They affect the print quality. In particular, it is necessary to set such parameters in which the filament feeder motor will release the specified amount of plastic. Otherwise, print defects may occur. The model will be spoiled. To avoid this, PID extruder calibration is done.
- Why do you need to adjust the PID extruder of a 3D printer?
- Step-by-step instructions for calibration
- How to avoid errors when adjusting the PID table of a 3D printer?
Why do you need to adjust the PID extruder of a 3D printer?
Precise adjustment sets parameters in G-code that make printing predictable and accurate. Extruder calibration may be required in case of:
- When the device started to produce print defects related to the nozzle adjustment.
- If the user upgraded the system: installed a new motor, fan, heater, or the entire extruder assembly.
Precise calibration allows for consistent printing. For this process, it is necessary to connect the printer to a PC or laptop and download special software.
Attention! One of the signs of incorrect calibration may be the appearance of a THERMAL RUNAWAY error when the printer is running. This indicates temperature spikes inside the extruder.
Step-by-step instructions for calibration
PRONTERFACE program interface.
Let's consider a step-by-step guide to setting the correct parameters for PID extruder calibration:
- Download the special PRONTERFACE program. You can get it on the official developer's website. Install the utility on your PC.
- Connect the 3D printer to the PC using a USB cable.
- Launch the PRONTERFACE program. In the utility interface, find the port you need to connect to, set the speed, and click the Connect button.
- A line-by-line list of settings will appear in the right text window. In some cases, an Error may pop up, you need to restart the program and set the port value again.
- Enter the command below the text field: M303 E0 S240 C10 press the Send button. The command breakdown is as follows: M303 - command to start calibration; E0 - indication for hotend calibration; S240 - test temperature; C10 - number of test cycles. The extruder calibration temperature may vary depending on the printer model.
- If done correctly, the device will display the PID autotune start command. Wait for the process to finish.
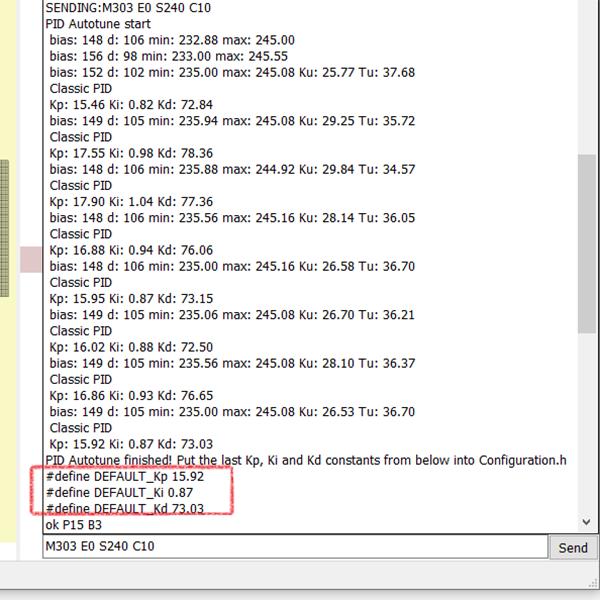
- After the test is completed, the system will display three coefficients in the text field: #define DEFAULT_Kp **.**, #define DEFAULT_Ki *.** and #define DEFAULT_Kd **.**. Write down the values after the lower space in each of the coefficients.
- Enter the obtained coefficients in the command: M301 P**.** I*.** D**.**. Send it through the Send button. For example, the command line may look like this: M301 P15.92 I0.87 D73.03.
- Save the result and send the command M500.
Entering the main command and obtaining PID coefficients.
After these manipulations, temperature spikes should be eliminated.
Attention! All commands are entered without quotes. The asterisks in the coefficients correspond to the numerical values shown by the program.
How to avoid errors when adjusting the PID table of a 3D printer?
Here we will list the most common mistakes and their solutions:
- When setting up the port, you need to set the connection speed to 25,000. If the program does not see the printer and the connection is not established, press the Reset button. The printer will reboot remotely, and the program will attempt to reconnect. Repeat this action until the connection is established. This is a feature of this software.
- Sometimes the THERMAL RUNAWAY error remains in the system. It may be necessary to calibrate the heated bed of the printer. This operation is performed according to a similar algorithm. The initial command changes slightly: M303 E-1 S* C10, where E-1 is the designation of bed calibration, and S* is the test bed heating temperature.
- The obtained data can be manually entered into the printer's memory. To do this, go to the device settings (Settings), find the advanced settings (Advanced Settings), and then go to the P, I, D settings. Enter the data manually, save the result obtained (Store settings). This way, you can enter PID data for both the extruder and the bed.
- To check if the settings have been saved in the system, send the M503 command.
Manual input of PID coefficients.
Be careful when entering commands and values. You can save the PID parameter in a separate text document and copy the data from there.
The extruder calibration process is an important thing. Without it, the printer will not work correctly, errors and print defects will start to appear. Follow the calibration process step by step, and you will not have any problems with the settings.
