Formlabs Form 3: the perfect 3D printer that prints truly "in 1 click"
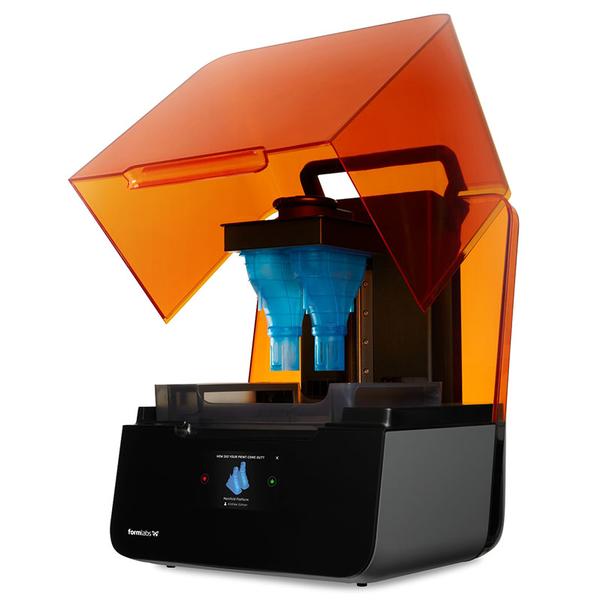
Formlabs Form 3 has become the successor of the famous Form 2 model. It currently holds the top position in our rating of 3D printers that print with polymers. Formlabs Form 3 challenges stereotypes with fundamentally new SLA printing technologies and the use of non-standard materials.
- History
- Technical specifications of Formlabs Form 3
- Outstanding automation
- Impressive performance
- But there is a nuance
- Configuration
- PreForm
- Control panel
- Printing
- Materials
- Postprocessing
- Is it worth it?
Form 3 was announced in the spring of 2019, and its shipments to the first buyers began in the summer.
Pluses
- The device stands out with exceptional productivity.
- All its aspects are thought through extremely cleverly and logically.
- The printer operates on the principle of "press and forget", printing on it can actually be done in one click.
Minuses
- Problems with dust inside the laser block start quickly.
- Polymer consumption in cartridges is not the most economical.
- There is no power-off button.
The printer is equipped with numerous sensors and processors. It also comes with software that takes the concept of 3D printing to a qualitatively new level. Formlabs Form 3 is the easiest to use and most reliable 3D printer of all the ones we have ever encountered.
If you are interested in high-detail, small-batch, and even fast prototyping, Form 3 is for you.
History
Formlabs is located in Massachusetts and began its activity with crowdfunding on Kickstarter. Since then, it has established itself as the most authoritative manufacturer of desktop 3D printers capable of printing high-quality products at affordable prices.
From the very beginning, Formlabs set the goal of democratizing SLA technology, creating an easy-to-use system that can be placed on a desktop. The brand's first device, Form 1, fully met these requirements, so the Kickstarter campaign was successful immediately after its launch. The young company took the right approach, responding to the obvious demand for affordable desktop SLA printing. Formlabs quickly expanded its activities to Europe and Asia and reached the status of a unicorn.
In 2015, Form 2 was released and demonstrated a number of innovations. The need for manual handling of polymers was eliminated and replaced by a much cleaner automatic cartridge system. The printer became more user-friendly and better suited for professional environments.
For 5 years, Form 2 remained the undisputed leader in its segment, and practically no one could challenge it. However, the manufacturer deemed it necessary to delicately retire it and replace it with the hot novelty Form 3.
Form 3 became a truly radical innovation, as it introduced unprecedented levels of part processing quality, speed, repeatability, and reduced the need for finished parts in post-processing. It employs the main concept of laser SLA printing in a completely different way than all previous devices.
Technical specifications
Formlabs has developed a fundamentally new print system for Form 3. It differs with its Light Processing Unit (LPU) and its implementation method in the device.
Traditional SLA devices for creating polymer models use a stationary laser beam directed by a pair of galvanometers with movable mirrors. Form 3, on the other hand, uses low-force stereolithography (LFS), in which the laser beam passes through a single galvanometer (directing printing along the Y-axis), a mirror, and a parabolic mirror. Throughout this process, the laser module moves back and forth along the print axis X.
This video demonstrates the LPU in action.
The path of the beam is so wide that it guarantees its perpendicular impact on the polymer at any point of the print plate. This ensures the stability of the printing process from the beginning to the end, as well as scalability (which will be clearly seen in action on the Form 3L model, which will be released in the same year and will be equipped with a dual LPU).
The LPU block moves along the lead screw driven by a stepper motor, mitigating vibration. Supposedly, due to these new moving elements, noise may occur during printing, but we did not notice it.
Outstanding automation
The device is equipped with a multitude of print process control sensors that monitor all aspects of the print microscopically. Form 3 has a large color touch screen, as well as connection to a computer. Thus, you are constantly aware of how much material is used from the cartridge, what happens with the polymer reservoir, how many millimeters of polymer are used for a particular print, what the final printing time, resolution and number of layers will be. You also get access to a full print history, displayed in a Gantt chart format. The print history also contains information about the user who initiated the printing process and about the specific printer (apparently, this is designed so that several devices can be connected to the Formlabs network at the same time).
- 85 µm
- 405 nm
- 1x250 mW
- LFS
- 145x145x185 mm
- Photopolymer
- 25 µm
- 5.5" 1280 × 720 touchscreen
- Wifi; Ethernet and USB
The LPU automatically presses the flexible film of the polymer reservoir to make it contact the print plate when sliding back and forth along the X-axis. Cartridges with polymers are also automatically filled from sealed cartridges and mixed before printing.
The dimensions of the print space are 145 × 145 × 185 mm, which is similar to the dimensions of Form 2 (though its Z-axis is slightly shorter). This gives Form 3 the additional compatibility bonus with the print platform from Form 2.
Impressive performance
This printer was developed to require as little control as possible from the user. The reviewer, of course, encountered a paradox: how to assess a device that does almost everything by itself? But for an engineer or for enterprises, this is the most favorable scenario.
By using Form Wash and Form Cure stations, you can independently manage the entire printing process: from the preparation stage to the post-processing of printed products. However, you may not want to do this because polymers are not the most pleasant material, and it is better not to risk spilling even a drop. However, it must be acknowledged that from the moment the print plate is opened and until the working with the washing and curing stations, the printer really requires only minimal control from the user.
But there is a nuance
However, even Form 3 is not perfect. During printing, we encountered minor dents on the surface of the prints. We faced this problem twice.
Consultants told us that in the first case the problem lay in the polymer reservoir, and to fix it, a new reservoir had to be inserted. In the second case, large dust particles settled on the inside of the LPU window.
The problem with dust is more difficult to address. When the printer is not in operation, the LPU is hidden from view and is located near the base of the device. The only time we saw the LPU in such a position where dust could settle on it was when we were trying to simulate the replacement of the LPU. We did this simulation exactly to remove dust from the LPU.
Another issue (or rather, missed opportunity) is that the printer for $3,499 could have had a power-off button.
Configuration
To configure the device, you need to enter the Wi-Fi password and create a user account. Each device is assigned a funny identifier – ours, for example, is called ImaginaryBunny. With this identifier, the printer connects to the PreForm software.
Then you will need to align the printer and connect it to the network. Connection can also be made using the Ethernet cable that comes with it. You should create a Formlabs account in the network to access the monitoring web panel. Here you can check the status of the printer, job history, active cartridges, and polymer reservoirs.
Polymer cartridges are inserted into the back of the printer – to reach it, you need to lift the lid. When the polymer reservoir enters the print chamber, it makes a specific sound. After both actions, the printer sends notifications confirming that the correct polymer has been selected for the job.
The print plate is fixed in place using the characteristic one-lever latch typical of Formlabs. After that, you need to configure and prepare for printing through PreForm.
PreForm
The program interface is a combination of white, orange, and blue. PreForm is perfect for "one-click" printing.
You can load a model into the program by dragging it into the workspace, accessing it through the file manager, or by dragging into the work area. The program will position and orient the blank, add support structures, and then through a dialogue box ask you to confirm the start of printing.
PreForm approaches the settings rather conservatively: it offers more support than necessary and avoids printing on the print plate (which sometimes saves time and material consumption).
PreForm consists of two areas: the workspace and the task information field. Size, orientation, support, and layout settings can be automated to simplify "one-click" printing.
It is striking that there is no possibility to make large models hollow through PreForm. This option is important for saving material in the consumption of samples that will not perform any mechanical functions. FormLabs recommends using Autodesk's Meshmixer, third-party software, for this purpose.
Control panel
You can control printing not only through PreForm but also through the control panel. This panel provides an overview of all devices available to the user, print jobs, all aspects of printing, and materials used.
FormLabs keeps the user constantly informed of material consumption. Polymer in cartridges runs out quickly, and the service life of polymer reservoirs is limited. You can order new consumables directly through the control panel.
Printing
If you use default profiles, you will only need to do one action: select the pre-approved layer thickness for the specific polymer.
The standard resolution ranges from 25 to 100 microns, but depending on the material, it may exceed these limits.
The print quality varies from "decent" to "excellent." The quality of the finishing depends on the material used. Flawless finish prints are obtained from the standard gray polymer with the V4 profile.
The most defects on the surface occur when using standard polymer, which can be transparent. These imperfections can be eliminated with wet sanding.
Materials
Form 3 hardly provides opportunities for experimenting with materials. If you pour the polymer directly into the reservoir, bypassing the cartridge, you will not be able to control the laser and LPU through PreForm. To take advantage of all the capabilities of the device, it is necessary to buy only consumables from Formlabs.
Postprocessing
The Form 3 kit includes the basic post-processing tool Finish Kit. It is equipped with double basins, a lid that can be operated with one hand, and a basket for storing prints and moving them between basins. The print plate will be separately and securely fixed on a stable stand.
To wash hard-to-reach areas, the kit includes a squeezable bottle with a long spout.
You can also purchase the Form Wash and Form Cure tools separately.
Unlike the Finish Kit, Form Wash and Form Cure provide automated post-processing of printed products, not manual. Form Wash washes samples, and Form Cure cures them with UV rays.
Is it worth it?
Form 3 will obviously be recommended to small or medium businesses that need a "workhorse" capable of thoroughly processing details. It is extremely easy to use and ensures stable production of high-detail prints. Also, thanks to new polymers, it is capable of producing large-scale draft models.
Some believe that consumables from Formlabs are too expensive. However, they provide outstanding reliability, which is extremely important in an industry where time means money.
Frankly, if we could spend the rest of our careers in 3D printing with the Form 3 printer and the Draft polymer, we would be in seventh heaven. It takes only a few seconds to configure this printer, and after a few more seconds, you can start "one-click" printing or set up partially automated print jobs. This is the essence of the improvements and innovations presented in Form 3.
